Let’s Get Technical: The Case for Effusion Analysis
By Dr. Holly Brown (DVM, PhD, DAVCP), Chief Veterinary Educator
Effusion analysis plays a vital role in veterinary medicine. It can help healthcare teams identify the underlying cause of fluid accumulation, classify effusions as transudates or exudates, guide treatment, and monitor disease progression — all leading to more accurate diagnoses, more targeted treatment plans, and improved patient outcomes.
As little as one drop of fluid can provide a wealth of information about a patient’s condition. But identifying, sampling, and analyzing fluids effectively is equal parts art and science. The following tips and tricks gleaned from an active hospital setting can help clinicians navigate the effusion process to render the most diagnostic information and best possible results for patients and their owners.
Fluid Identification
Veterinary fluid samples are obtained primarily through ultrasound-guided abdominocentesis and thoracocentesis. Ultrasound works very well for identification as the clinician can visualize even very small pockets of fluid, which is important because even a drop of fluid can provide significant information.
Pro Tip: Stay away from using ultrasound gel when obtaining a cytology sample, whether from a mass or fluid. Ultrasound gel, even if it’s been wiped off the patient, will leave a granular artifact on slides once it’s stained, making it difficult to confidently identify bacteria or other cellular details.

Another option for obtaining fluid samples, particularly for patients that have had surgery, is using the fluid collected in a Jackson Pratt drain. This fluid works particularly well for trending post-operative patients with drain placements, as clinicians can (non-invasively) observe changes in that fluid over the course of several days as a way to gauge whether antibiotics are working, if there is a concern for any surgical complication, and when to remove the drain.
Sample Handling
Two types of tubes are used to collect and process non-heme fluids. The first, and probably more important, is an EDTA tube (purple top). The second, which can be thought of as a “bonus” tube, is a non-additive tube (either a red or white top, depending on the manufacturer).
- EDTA in the purple-top tube will prevent clotting of the sample and help preserve cell morphology, keeping cells healthy and fresh. This is especially important if the sample is being sent to a reference lab. With the EDTA tubes, only fill to the indicated fill volume (don’t overfill).
- The non-additive tube, with the red or white top, can be used for things like culture and biochemistry testing. This “bonus” tube can hold extra fluid sample, when available, to have on hand for this ancillary testing, in case it is needed.
In-House Analysis
A fluid analysis consists of visual examination of the sample for color and turbidity, protein concentration and nucleated cell count determination, and microscopic analysis. Total protein measurement, a nucleated cell count, and cell identification will help to classify the fluid as transudate, modified transudate, or exudate.
Color and Turbidity
Noting visual observations about color and turbidity is important, especially if a cytology slide will be sent to the reference lab as the clinical pathologist at the lab won’t be able to make those observations.
Protein Measurement
Measuring protein in fluid can be done two ways: with a refractometer, the method typically used for urine specific gravity (USG) and sometimes plasma protein measurement, or an in-clinic chemistry analyzer. For refractometry, place a small drop of fluid (like what’s done for urine specific gravity) and then look inside — in addition to the scale for urine specific gravity measurement there often is also a scale for serum or plasma protein measurement. With a chemistry analyzer, you can use the total protein slide that comes with the in-house chemistry analyzer to measure the protein.
Using a Hematology Analyzer for Nucleated Cell Count
The easiest way to measure the total nucleated cell count (TNCC) of an effusion in your clinic is by using an in-clinic hematology analyzer. These analyzers are excellent cell counters, and they can quickly and easily provide a WBC (white blood cell) count, which can be extrapolated to reflect the fluid’s TNCC. Some analyzers have been specifically validated for effusion cell counts, and some have specific programs to facilitate the analysis.
Preparing Slides for Microscopic Analysis
There are two types of cytologic preparations that can be useful for in-house fluid analyses: direct smears and sediment smears.
A direct smear is very much like a blood film. Take a drop of fluid out of the EDTA purple-top tube and place it at the back end of the slide. As with blood film, take a spreader slide, pull it back into that drop at between a 35-to-45-degree angle, and then push it along the sample slide to get a nice, feathered edge. This direct preparation can be used for a manual total nucleated cell count.
The sediment smear is an additional preparation that is particularly useful for reviewing low cellular effusions. The sediment smear concentrates the cells so that they can be reviewed more efficiently and effectively. A fluid sediment preparation begins as is typically done for a urine sediment preparation—by putting a small amount of the EDTA fluid sample into an Eppendorf tube and spinning it down in a centrifuge. The resulting supernatant is decanted and the remaining pellet of cells at the bottom of the tube is reconstituted. The slide can then be prepared like the direct smear (similar to a blood film), or the cells can be further concentrated on the slide by a line prep technique. For the latter, a small drop of the remixed sample is placed at one end of the slide, and a second slide is used to push the sample about ¾ of the way across the slide, but then the spreader slide is lifted straight up. Then, rather than a feathered edge, there is a resultant line of concentrated cells which facilitates cytologic review of the slide.
Tip from the Lab: In lieu of using a hematology analyzer to get to total nucleated cell count, the direct smear can be utilized for an estimated count.
Here’s how:
- Stain the slide routinely with Diff-Quik and let it dry.
- Using the microscope, at either 40x or 100x oil objective, obtain the average nucleated cells per field over 10 fields. To get average nucleated cells, in each field count 1, 2, 3, 4, 5, 6, etc. nucleated cells, across 10 fields; total the numbers up and divide by 10 to obtain the average nucleated cells per field.
- Take the average nucleated cells per field and multiply that number by the objective squared. For example, if using a 40x objective, the formula is: Average nucleated cells per field x 402 = TNCC/μL. If using a 100x objective, multiply the average nucleated cells per field x 1002.
- The TNCC/μl can then be used as part of the fluid classification.
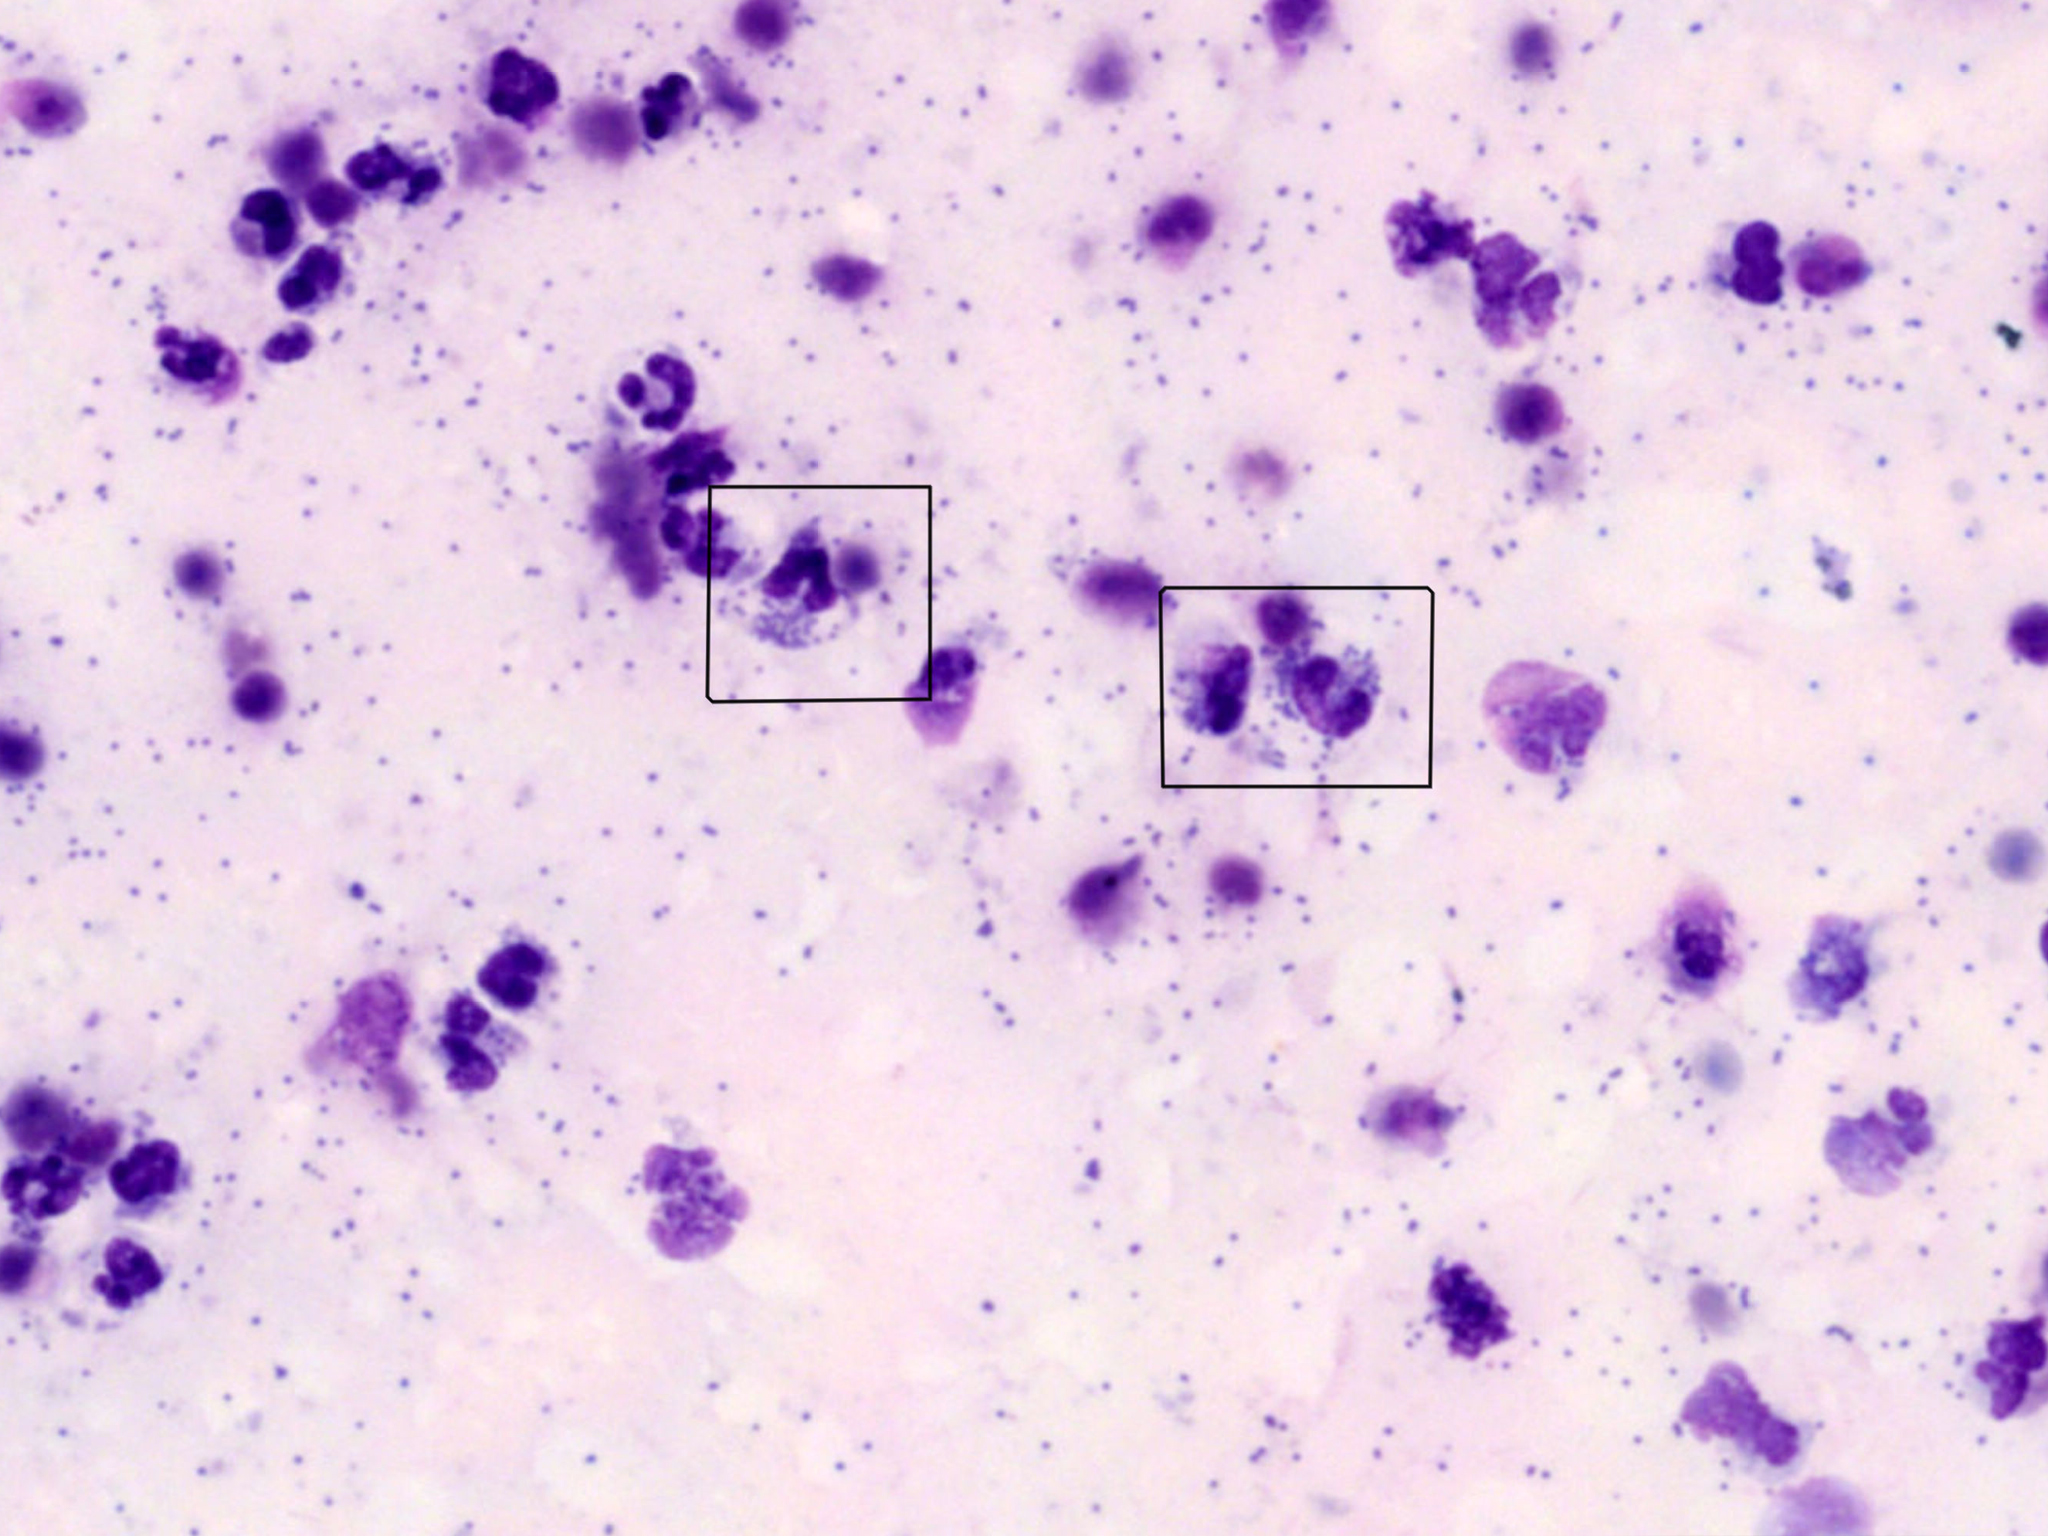
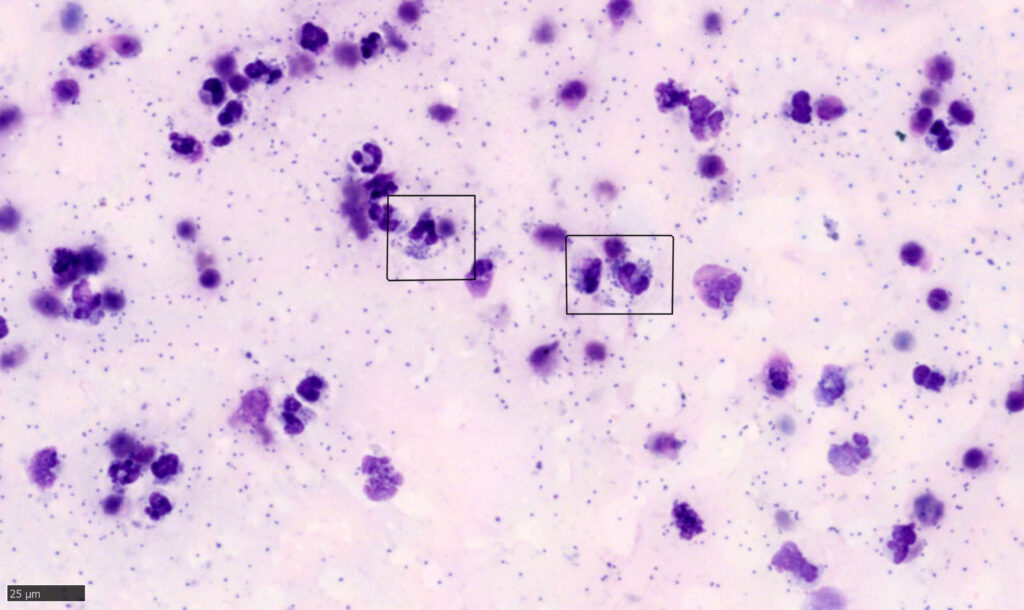
Cytologic Review of the Fluid
As a rule (with some exceptions), many of the same cells that are in a blood film may be present in an effusion. These include red blood cells and mixed leukocytes: neutrophils, lymphocytes, monocytes, eosinophils, and basophils. For fluids, other larger mononuclear tissue cells, including macrophages and mesothelial cells (the cells that line the body cavities and organ surfaces), are classified together with monocytes as large mononuclear cells. Other cells that can be seen in fluids include other tissue cells like mast cells, plasma cells, or neoplastic cells. When there is any concern with cells’ morphology or atypia, it may be best to have a clinical pathologist confirm the cells’ identity and interpret their significance.
Biochemical Testing
Biochemical testing of fluids, and comparison to the paired values in the blood, can provide further insights into underlying pathologic processes Biochemical testing is performed on the fluid sample that is saved in the non-additive (white- or red-top tube) and can be measured by many in-clinic chemistry analyzers that does not contain an additive.
There are some specific conditions for which biochemical testing of an effusion can help confirm the diagnosis:
Bile peritonitis is an emergency that requires surgical intervention to repair. Rupture of the gallbladder or intrabdominal leakage of bile from elsewhere in the biliary tree is supported by a higher level of bilirubin in the fluid sample as compared to that of the peripheral blood.
Septic peritonitis is another critical emergency. If suspected, measurement of both glucose and lactate can be helpful. In septic cases, glucose measurement in the effusion is commonly lower than that of the blood. In contrast, lactate is commonly higher in the effusion than in the blood with underlying septic processes in dogs (please note: this has not been shown to be reliable for cats).
Pro Tip: Given the amount of variability in handheld glucometers, do not use them for glucose measurement. Also, try to make sure that both measurements are happening at the same time, obtaining a fresh glucose reading from both the peripheral blood and from the fluid sample.
Uroabdomen is yet another emergency that can result in an effusion. The diagnosis is supported by elevated creatinine and potassium levels in the effusion relative to that of the blood.
Key Takeaway: Effusion analysis is a vital diagnostic tool in veterinary medicine, offering numerous benefits that enhance patient care.
By identifying, examining, and testing fluid accumulations from body cavities, veterinarians can classify the effusions, gain insights into underlying pathologic processes, guide treatment strategies, and monitor disease progression for the best possible patient outcomes.
Interested in hearing more about effusion analysis? Please listen to our Tails from the Lab podcast episodes: Tech Talk: Effusion Analysis (Part 1) and Tech Talk: Effusion Analysis (Part 2) wherever you get your podcasts.